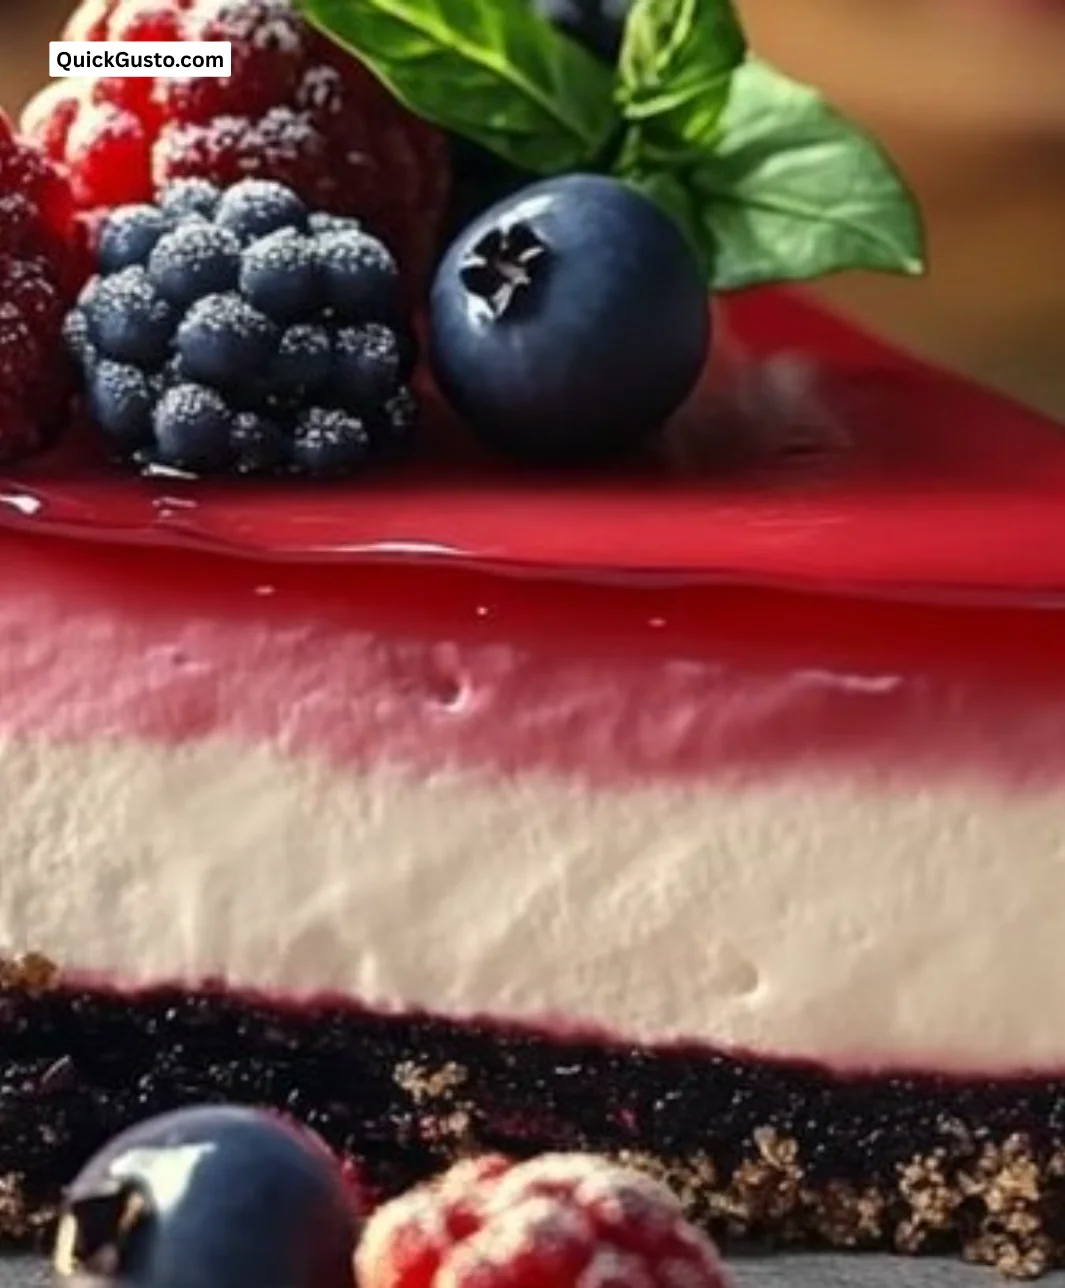
There’s a special kind of magic that happens when you create a dessert that feels like a celebration. For me, that magic comes alive with my No-Bake Berry Cheesecake. It’s light, creamy, and absolutely bursting with flavor from the fresh berries. This recipe holds a special place in my heart, evoking memories of summer potlucks and family gatherings where the dessert table always seemed to sparkle with color and anticipation.
I remember the first time I brought this cheesecake to a family gathering. Everyone’s eyes lit up as I placed it on the table, and when they tasted it, the smiles were even brighter. The combination of the rich cheesecake with the tartness of the berries is nothing short of a heavenly delight. It’s a dessert that looks impressive but is incredibly simple to make, allowing you to enjoy more quality time with loved ones and less time in the kitchen.
Recipe Timing
- Prep Duration: 30 minutes
- Active Cooking: 15 minutes
- Total Duration: 4-5 hours (or overnight for best results)
- Portion Size: Serves 8
- Complexity: Simple
Nutritional Recipe
- Calories per portion: Approximately 320
- Protein: 5 g
- Carbs: 35 g
- Fats: 20 g
- Fiber: 1 g
- Sugars: 22 g
- Sodium: 135 mg
Why You’ll Love This No-Bake Berry Cheesecake
What’s not to love? This No-Bake Berry Cheesecake is creamy without being overly heavy and offers a delightful freshness from the berries. It’s perfect for any occasion, whether it’s a summer barbecue, a holiday feast, or just a simple family dinner. Plus, there is no baking involved, which means less time in the kitchen and more time enjoying the company of friends and family. The visually stunning layers of cheesecake and berry sauce also provide an aesthetic appeal that is sure to impress!
The Complete Cooking Journey
Let’s embark on this delightful journey together! We’ll start by preparing the crust, which will serve as the foundation for our cheesecake. Then we’ll whip up that dreamy filling before finishing off with a luscious berry topping. The best part? You’ll be feasting on this beauty in just a few hours!
Ingredients:
- 1½ cups cookie crumbs (graham cracker, digestive cookies, or ladyfingers) (180 g)
- ¼ cup butter, melted
- 8 oz cream cheese (remove from fridge 30 minutes before using)
- ¾ cup powdered sugar
- ¾ tsp vanilla extract
- 1 cup heavy cream
- 1 tbsp gelatin
- 2 tbsp milk (2% recommended)
- ½ cup blueberries
- ½ cup raspberries
- ¼ cup + 2 tbsp sugar
- ½ tbsp cornstarch
- Pinch of cinnamon (optional)
- 2 tbsp water
- ½ tbsp lemon juice
Method:
Step 1: Prepare the Cookie Base
In a bowl, mix the cookie crumbs with melted butter until well combined. Press this mixture into the bottom of a 7-8 inch (17-20 cm) springform pan to form a solid base. Place the pan in the refrigerator while you prepare the cheesecake filling.
Step 2: Make the Cheesecake Filling
In a medium bowl, beat together the cream cheese, powdered sugar, and vanilla until smooth and creamy. Set this mixture aside. In a separate bowl, whip the heavy cream until thick peaks form.
Step 3: Dissolve the Gelatin
In a small pot, combine the milk and sprinkle the gelatin over it. Allow it to sit for 1 minute, then heat gently until the gelatin dissolves completely—about 1-2 minutes. Be careful not to let it boil.
Step 4: Combine Gelatin with Cheesecake Mixture
Add 1-2 tablespoons of the cream cheese mixture to the gelatin mixture and stir gently. Now, fold the gelatin mixture into the remaining cream cheese mixture until well blended. Finally, fold in the whipped cream until everything is combined in a light and airy filling.
Step 5: Assemble the Cheesecake
Take the cookie base out of the fridge and pour the cheesecake filling evenly on top. Cover the cheesecake with plastic wrap and refrigerate for 4-5 hours or preferably overnight for the best results.
Step 6: Prepare the Berry Topping
In a medium pot, combine the blueberries, raspberries, sugar, cornstarch, optional cinnamon, water, and lemon juice. Bring this mixture to a boil, then reduce the heat and let it simmer until thickened to your desired consistency. Let it cool and refrigerate for at least a few hours to allow it to set further.
Step 7: Serve
When you’re ready to feast, top the cheesecake with the berry mixture before serving, or add it to individual slices. For an extra treat, consider serving it over a scoop of ice cream!
Serving Suggestions & Pairings
This cheesecake pairs beautifully with a light summer salad or a refreshing glass of sparkling lemonade. If you feel ambitious, serve it alongside a scoop of vanilla ice cream for a delightful contrast in texture and temperature.
Storage & Leftovers Guide
Store any leftover cheesecake covered in the refrigerator for up to 3 days. The berry topping can also be kept in the fridge for the same duration. Just make sure to store them separately to maintain the best texture.
Kitchen Wisdom & Success Tips
- Ensure that your cream cheese is at room temperature for easier blending, which will create a smoother filling.
- Double-check that your gelatin fully dissolves to avoid any lumps.
- Feel free to use other berry combinations like strawberries or blackberries if you prefer.
Flavor Variations & Adaptations
- For a chocolate version, use chocolate cookie crumbs for the base and add cocoa powder to the cheesecake filling.
- You can experiment with different fruits for the topping, such as peaches, mangoes, or cherries, depending on your seasonal cravings.
Reader Questions & Solutions
-
Why is my cheesecake not setting?
If your cheesecake isn’t setting, it may be because your gelatin wasn’t fully dissolved or incorporated properly. Be sure to follow the steps closely and let it chill adequately. -
Can I use low-fat cream cheese?
Yes, low-fat cream cheese can be used, but it may affect the creamy texture slightly. Adding a touch more heavy cream can help compensate for the density. -
What can I substitute for gelatin?
You can use agar-agar as a vegetarian alternative to gelatin. Make sure to follow the package instructions for proper measurement and use. -
How do I prevent a soggy crust?
Make sure to press your crust firmly into the pan and consider pre-baking it for about 10 minutes if you prefer extra stability, even for a no-bake cheesecake. -
Can I freeze the cheesecake?
Yes! You can freeze the cheesecake for up to a month, but it’s best enjoyed fresh. Thaw in the refrigerator before serving.
Wrapping Up
This No-Bake Berry Cheesecake is more than just a dessert; it’s an invitation to gather, share, and create lasting memories around the table. It’s one of those dishes that looks complex but is surprisingly easy to make. Dive into the world of flavor with each creamy, berry-filled bite, and enjoy the smiles that come from serving something truly special. Whether it’s a celebration or just a treat for yourself, this cheesecake is sure to brighten your day! Happy baking (or rather, chilling)!
Print
No-Bake Berry Cheesecake
- Total Time: 300 minutes
- Yield: 8 servings 1x
- Diet: Vegetarian
Description
A light and creamy dessert bursting with flavor from fresh berries, perfect for celebrations and gatherings.
Ingredients
- 1½ cups cookie crumbs (graham cracker, digestive cookies, or ladyfingers) (180 g)
- ¼ cup butter, melted
- 8 oz cream cheese, at room temperature
- ¾ cup powdered sugar
- ¾ tsp vanilla extract
- 1 cup heavy cream
- 1 tbsp gelatin
- 2 tbsp milk (2% recommended)
- ½ cup blueberries
- ½ cup raspberries
- ¼ cup + 2 tbsp sugar
- ½ tbsp cornstarch
- Pinch of cinnamon (optional)
- 2 tbsp water
- ½ tbsp lemon juice
Instructions
- Prepare the Cookie Base: In a bowl, mix the cookie crumbs with melted butter until well combined. Press this mixture into the bottom of a 7-8 inch (17-20 cm) springform pan. Place the pan in the refrigerator.
- Make the Cheesecake Filling: In a medium bowl, beat together the cream cheese, powdered sugar, and vanilla until smooth. In a separate bowl, whip the heavy cream until thick peaks form.
- Dissolve the Gelatin: In a small pot, combine the milk and sprinkle the gelatin over it. Allow it to sit for 1 minute, then heat gently until dissolved—about 1-2 minutes.
- Combine Gelatin with Cheesecake Mixture: Add 1-2 tablespoons of the cream cheese mixture to the gelatin and stir gently. Fold in the gelatin mixture into the remaining cream cheese mixture and then fold in the whipped cream.
- Assemble the Cheesecake: Pour the cheesecake filling into the prepared cookie base. Cover with plastic wrap and refrigerate for 4-5 hours or overnight.
- Prepare the Berry Topping: In a medium pot, combine the berries, sugar, cornstarch, cinnamon, water, and lemon juice. Bring to a boil, then let it simmer until thickened. Cool and refrigerate.
- Serve: Top the cheesecake with the berry mixture before serving.
Notes
Store any leftovers in the refrigerator for up to 3 days. Use different fruits for topping to suit seasonal cravings.
- Prep Time: 30 minutes
- Cook Time: 15 minutes
- Category: Dessert
- Method: No-Bake
- Cuisine: American
Nutrition
- Serving Size: 1 slice
- Calories: 320
- Sugar: 22g
- Sodium: 135mg
- Fat: 20g
- Saturated Fat: 12g
- Unsaturated Fat: 8g
- Trans Fat: 0g
- Carbohydrates: 35g
- Fiber: 1g
- Protein: 5g
- Cholesterol: 45mg